Update on door framing (Chris Craddock - Legacy Post)

All builds of the 1/8 Jaguar XKE E-Type (Revell Monogram or Partwork Models all accepted)
Post Reply
admin
Site Admin
Posts: 36
Joined: Sat Aug 23, 2025 10:33 am

Update on door framing (Chris Craddock - Legacy Post)

Post by admin »

Chris Craddock

Update on door framing
in 1/8 Revell Jaguar E-Type
Well that was “fun”. I have spent most of the last week or so trying to get a positive locating mechanism for the inner and outer door skins. I need to get the doors properly located in the door openings before I can fit fhe hinges. So let’s talk door skins. The kit has an outer door skin with a thick pin/thin pin locator for the inner door skin. One side fits fine, the other doesn’t. I know, shocking right?

Image

Image

Image

The kit inner door skin has cuts in it to receive their goofy hinges. For the “real” kit, all of that is positively located, even if it’s ugly. But in my case there is no fore/aft location between inner and outer door skins. There is also no way to keep the outer skin aligned with the inner skin. In the pix above you can see I cut slots into the inner rear door faces for magnets to “latch” the door when shut.

The entire fit is <ahem> “casual”. So I had 3-4 goes at providing some inner structure to the doors, as well as positively locating the skins. I thought I would build some structure to “capture” inner skin and hold it. That was stupid because of all the curves. I have 3+ degrees of freedom within the physical constraints of the rear door jambs and fronts. So… this

Image

Image

Image

I added styren to “fill” the gap between the inner and outer skins forward of the A-pillar line and a curved strip of styrene to prevent the outer door skin from sliding past the inner. That worked. Then I spent a couple of hours sanding and test fitting the doors. Here’s where I ended up…

Image

Image

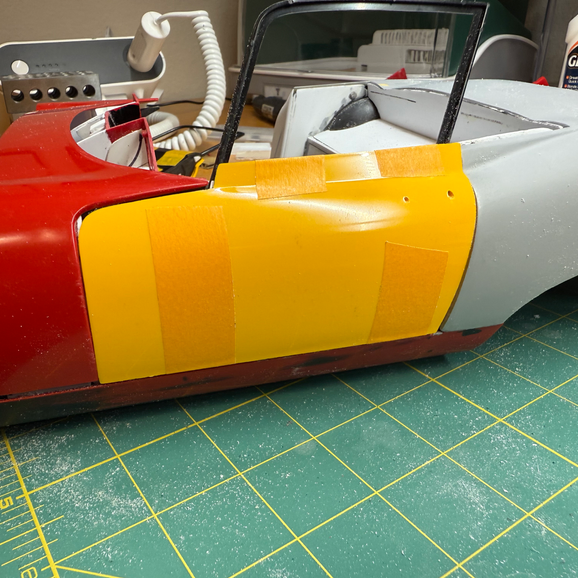
the inners and outer are positively located and I used paper tape to lock them together for fitting into the door frames. I ended up doing a lot of sanding on the rear door jambs. They intruded a little too much, but I was able to shave them down. I will still neeed to trim a little more here and there, and on the driver’s side I will need to “fill” the gap you can see. For some reason the floor isn’t lining up as well as I’d like, but I can get around that.

Now I know everything fits, and I know where I need to mount the hinges on the front kick panels. The mounting points inside the outer door skins are going to need a little work, but we’re going to have fully functional doors. <sigh>

Cheers,

Chris
admin
Site Admin
Posts: 36
Joined: Sat Aug 23, 2025 10:33 am

Re: Update on door framing

Post by admin »

Chris Craddock
Now that I have the doors sorted out, I am taking a breather on the Jag. I have a swag of Colin’s detail parts on the way. Ut that’s sort of burying the headline. After watching the amazing stuff Gilles has been doing, I decided to up my game a bit. I have a new 550W 7”x14” metal lathe on the way. And a new 720W Genmitsu CNC. And a new Elegoo Saturn 4 Ultra 16K 3D resin printer. Plus a few other bits and pieces.

I have access to a friend’s 3D scanner and I will experiment with that before buying one of my own. At this point I should be able to design 3D parts and produce them with the kind of accuracy I want.

In the mean time I have cleaned up my bench and put the jag parts aside ready for when the new Leadfoot parts arrive. I’m toying with doing a quick out of the box build as a palate cleanser.


Gilles
Hi Chris,
Investing in these machines is a worthwhile decision, and as you master the design software, your production quality will greatly improve.

I am looking forward to seeing that!

Gilles
You have nice shoes!😅

When I see all the work to be done for the correct adjustment of the doors, I admit to being a little afraid when I get to this stage. It is also true that you chose the most difficult path with this convertible conversion but you are doing quite well and the results are promising..

Continue to delight us with your advances! 👍

Chris Craddock
Thanks Gilles! Likewise, you're inspiring me (and I happen to know you're inspiring Colin too!). So today I ordered a lathe and a high res 3D resin printer. I may or may not end up adding a vertical mill to the lathe, but for now I think I am much better placed to do more accurate scratch builds.

The lack of precision has been a significant impediment with what I have been doing. I roughly mark out the shape I need with a fine "sharpie" pen on a piece of appropriate styrene stock with approximately the size I need. Then I take the part(s) to my material down to my workbench disk sander and shave it down to the edge of the sharpie marks.

After that it's (often hours) of laborious hand sanding and test fitting to get parts that work. I have access to a friend's 3D scanner and I'm very comfortable with design software, so it could be so much easier!
Post Reply